 Pin to Board
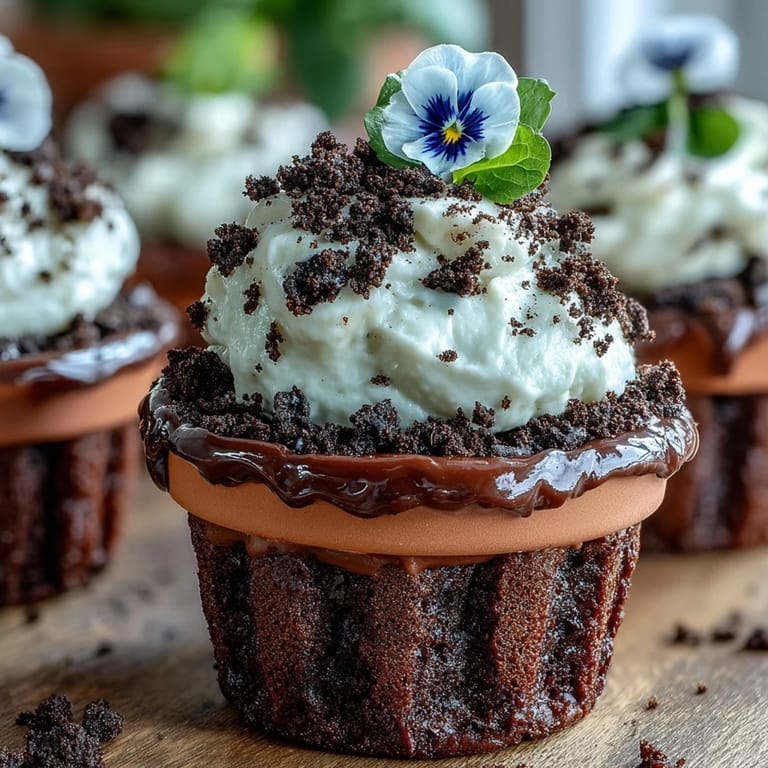
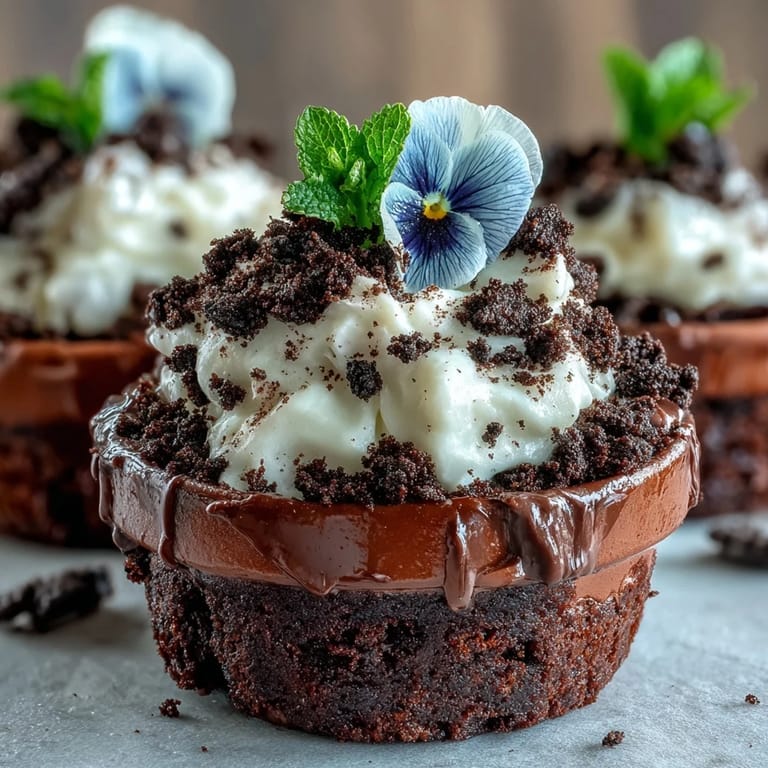
 On a spring morning that buzzed with quiet anticipation, the smell of brownies wafting from the kitchen drew curious noses away from bouquets being arranged for Mother's Day. The idea for flower pot brownies came about one year when I spotted those cute little terracotta pots at the back of my cupboard—twin relics from a gardening phase that never quite blossomed. There was something infectious about turning a classic dessert into a playful tablescape centerpiece. Spoonfuls of chocolate, creamy clouds of whipped cream, and a crunchy Oreo topping instantly turned dessert into a conversation piece. I found myself smiling at the absurdity and joy that edible dirt could bring to a Sunday afternoon.
The first time I served these, my sister thought I'd actually handed her a potted plant as a joke—watching her hesitation before plunging in a spoon cracked us all up. There was a lively clatter of spoons against ceramic, whipped cream mustaches, and a table full of ridiculous flower puns. Even my mother, never one for fussy desserts, was caught sneaking extra bites, her "gardening" spirit unabashed. Sometimes, the best memories come from simple desserts dressed up for a special day. Now, these brownies are as much a part of Mother's Day as the bouquet on the windowsill.
Ingredients
- Unsalted butter: Rich and creamy, it gives the brownies their fudgy texture; I learned to melt it slowly so it never scorches.
- Granulated sugar: Sweetness with a little crunch when well mixed, this helps the tops crackle nicely.
- Eggs: The key to binding and keeping brownies moist; always crack one at a time for perfect texture.
- All-purpose flour: Just enough structure without making the brownies dry—don't overmix or they'll get tough.
- Unsweetened cocoa powder: Deep chocolate flavor that shines through; use a good quality brand so the flavor pops.
- Baking powder: A little lift makes these brownies the ideal consistency for digging with a spoon.
- Salt: Balances the sweetness and enhances cocoa; I never skip that pinch.
- Vanilla extract: Warmth and depth; add it after melting the butter for the most fragrant brownies.
- Oreo cookies: The magic dirt; bash them with a rolling pin for bigger "soil" clumps or use a food processor for fine dirt.
- Heavy cream: Whips into luscious peaks; make sure it's cold from the fridge for the fastest, fluffiest results.
- Powdered sugar: Lightly sweetens the whipped cream and sets those cloudlike swirls on top.
- Edible flowers: They make each pot unique; I always double check they're food-safe before topping.
- Fresh mint leaves (optional): For a truly garden-fresh aroma and look; a sprig or two works wonders.
Tired of Takeout? 🥡
Get 10 meals you can make faster than delivery arrives. Seriously.
One email. No spam. Unsubscribe anytime.
Instructions
- Prep the Oven and Pots:
- Heat the oven to 175°C (350°F). If your mini flower pots are oven-safe, line the bottoms with parchment to avoid any stuck brownies; if not, prep a baking tray and line it for easy cutting.
- Melt and Marry Butter:
- Gently melt the butter on low, letting it just liquefy so it stays creamy, then whisk in the sugar and vanilla until it smells dreamy and looks glossy.
- Blend in the Eggs:
- Add the eggs one by one, whisking well after each so your batter turns silky and thick.
- Combine Dry Ingredients:
- Sift together flour, cocoa, baking powder, and salt, then lightly fold the dry blend into your chocolatey mix, stopping as soon as the streaks disappear.
- Bake to Fudgy Perfection:
- Divide the batter among the prepared pots (or into your lined tray), smoothing the tops, and bake for 20–25 minutes—when a toothpick comes out with just a few moist crumbs, you're there; let them cool completely.
- Make the Magical Dirt:
- While waiting, blitz the Oreos—cream and all—in a food processor, or work out some frustration by smashing them in a bag with a rolling pin, until you get fine, soil-like crumbs.
- Whip the Cream Clouds:
- Pour cold heavy cream into a bowl, shake in the powdered sugar, and use an electric mixer to whip to stiff, dreamy peaks that hold their shape.
- Assemble the Layers:
- If you used a tray, cut brownies to fit the pots. Spoon a fluffy whipped cream layer onto each, then pile on the Oreo dirt like you're filling a real flower pot.
- Decorate Like a Garden:
- Stick in edible flowers or gummies and a few mint leaves for good measure—there are no rules, just have fun making each pot a tiny garden.
- Chill Before Serving:
- Transfer the pots to the fridge and chill until ready to serve; they're best cool and sturdy.
 Pin to Board
  Pin to Board
 When my nephew squealed with delight at the sight of his own edible "plant," it hit me that these brownies were more than just a quirky recipe—they're a way to surprise loved ones and spark joy at the table. Whether served at a family brunch or just as a treat on a rainy day, the laughter and surprise they bring stick with you.
Picking the Perfect Pots
If you can score mini terracotta pots, the presentation is unbeatable, but ramekins or even thick cups also work beautifully if you're in a pinch. Just be sure whatever you use is oven-safe and cleaned well—nobody wants faint echoes of old soil in their brownie. I've had great results lining the bottom with parchment and even running a bit of butter around the insides to help the brownie unmold if needed. Once I tried plastic flower pots—lesson learned, those are for crafting only! If you have extra, fill a few with gummy worms for fun.
Getting Creative with Decorations
Edible flowers like violets or pansies always steal the show, but I've also used colorful gummies or even berries for more playful themes. For little hands, letting them stick candies and flowers on their own pot is half the fun. A few extra mint leaves not only look the part but lend an earthy aroma that completes the garden vibe. Sometimes I set up a decorating 'bar' so everyone can make a unique brownie plot. No two pots ever come out quite the same, and that's the charm.
Making It Ahead (So Easy!)
This dessert is a champion of make-ahead prep—I've baked the brownies and made the dirt the day before, then just whipped cream and decorated right before serving. Store the cooled brownies well wrapped so they don't pick up any fridge smells, and crush your Oreos ahead for a quick assembly line. Don't add the whipped cream or dirt more than a few hours before serving though, as unexpected fridge humidity can soften things. If you've used fresh flowers, put them on at the very last moment to keep them looking perky.
- A drizzle of chocolate sauce between layers is never a bad idea.
- Leftover whipped cream is perfect on weekend pancakes.
- Don't stress perfection: the more rustic, the more everyone smiles.
 Pin to Board
  Pin to Board
 However you decorate or serve these, the joy on everyone's faces is the sweetest part. Wishing you a Mother's Day full of laughter, crumbs, and a little edible garden at every place setting.
Recipe Questions & Answers
- → Can I use a baking tray instead of flower pots?
Yes. Bake in a lined tray, cool completely, then cut rounds or squares to fit mini pots. This is often easier if you don't have oven-safe pots.
- → How do I make the Oreo 'dirt'?
Pulse Oreos in a food processor until fine crumbs form, or place in a resealable bag and crush with a rolling pin for a coarse, soil-like texture.
- → How do I get stiff peaks for the whipped cream?
Chill the bowl and beaters, then whip cold heavy cream with powdered sugar on medium-high speed until peaks hold shape but are not grainy. Stop as soon as they hold.
- → Are edible flowers safe to use?
Use only food-safe flowers from reputable sellers or grow your own without pesticides. Violets, pansies and some nasturtiums are common choices; always confirm edible status before serving.
- → Can I prepare components ahead of time?
Yes. Brownies and Oreo crumbs can be made a day ahead and stored tightly covered. Whipped cream is best made just before assembly, but can be refrigerated briefly if needed.
- → How can I keep brownies moist?
Avoid overbaking: remove when a toothpick shows moist crumbs. Let brownies cool fully before adding cream to help retain moisture, and store finished pots chilled in an airtight container.